
Grok Voice brings two workflows into one workspace: Text to Speech turns a written script into audio, while Speech to Text turns a recording into a transcript. This guide walks you through the controls you will actually use, starting with your account and finishing with a download.
For a voiceover, follow steps 1–6. For audio transcription, sign in first, then jump to steps 7–8. Have your script or recording ready, and keep an original copy. The illustrations use example content to show where to click; your account balance, available voices, and results will reflect your own session.
Sign in to your Grok Voice account
Start with Sign in in the top-right corner of the website.
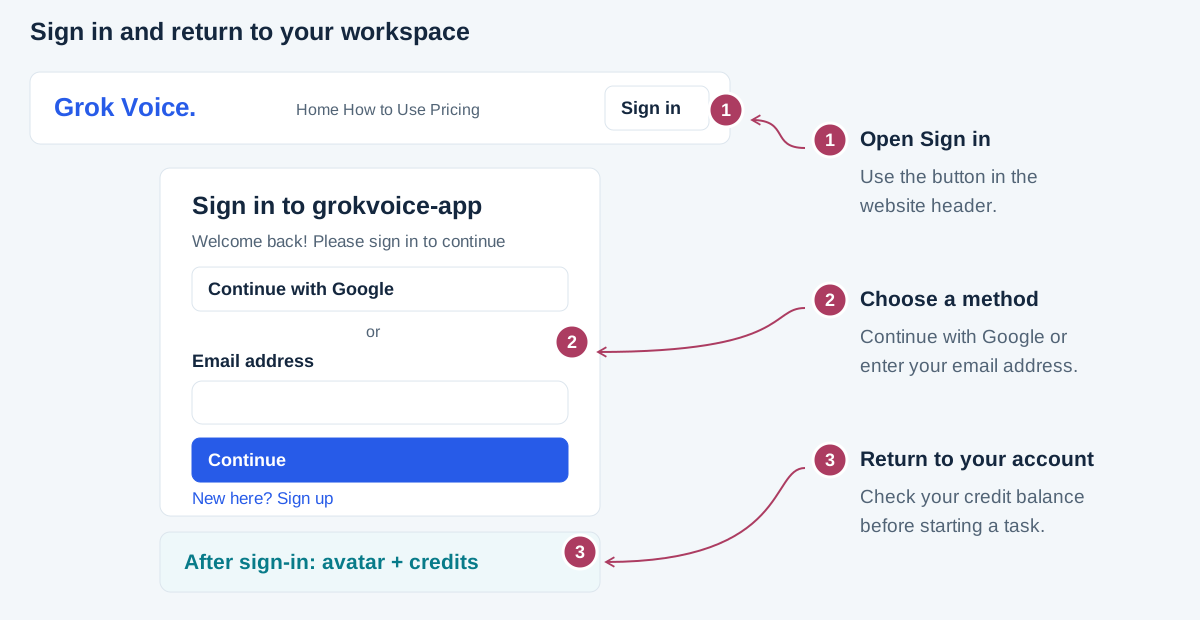
Select Sign in to open the account dialog. The current sign-in screen offers Continue with Google or an Email address field followed by Continue. Choose a method and complete the verification shown on screen. If you are new, use Sign up to create an account. Follow the options in your own dialog if they differ from this illustration.
After signing in, look for your avatar and credit balance in the header. Open the avatar menu and choose My Account to view available, free, and purchased credits. Refresh balance requests an updated balance. If you need more credits, open Pricing and review the available pack before continuing. Use the displayed account balance rather than assuming a fixed signup allowance or cost per task.
You can prepare text and settings as a visitor, but generating requires sign-in. After returning, review the restored draft and click the generation button yourself: signing in does not automatically start a task. A local audio file is not saved with your draft, so select it again if the page reloads.
Choose Text to Speech and add your words
Use the Text to Speech tab when your starting point is a written script.
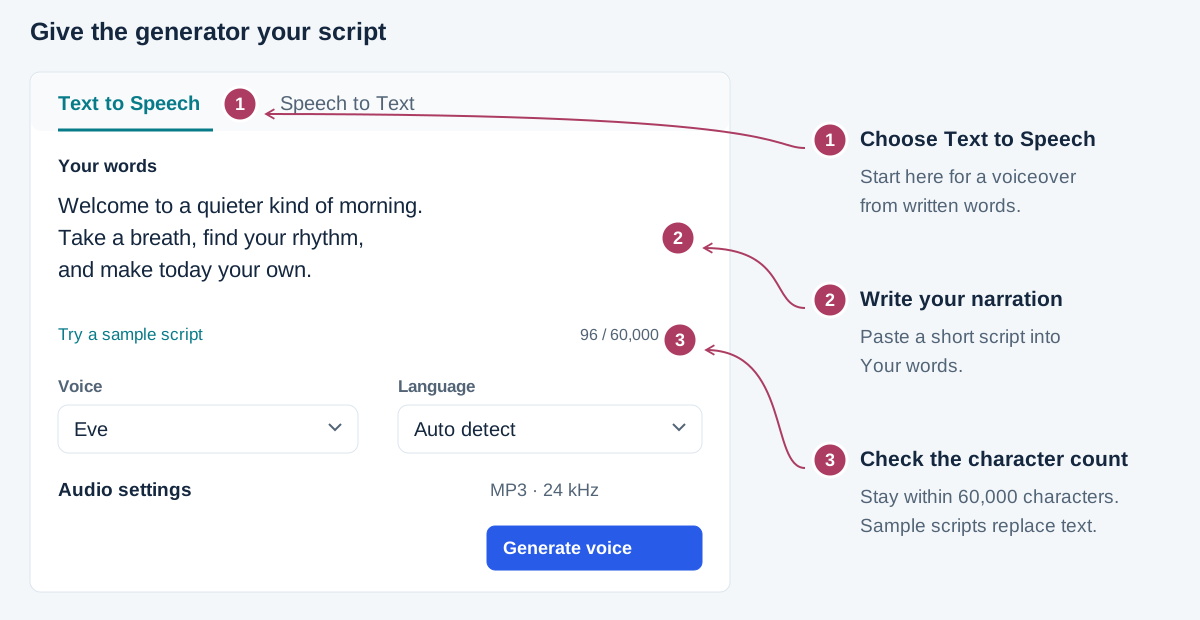
Open the generator on the homepage and select Text to Speech. Type or paste your narration into Your words. The counter beneath the editor helps you stay within the 60,000-character limit. Start with a short paragraph while learning the workflow; a focused passage makes pronunciation and pacing easier to review than a complete chapter.
Write as you would speak to your audience. Keep instructions in order, use punctuation to separate ideas, and remove headings or production notes you do not want spoken. For a product demo, describe one action at a time. For a lesson, introduce a term before explaining it. Spell out ambiguous abbreviations and check how you want dates or numbers read.
Try a sample script provides example wording and replaces the current text. Save your own writing elsewhere before using it. Keep a separate copy of the approved script, especially for longer projects. The draft saved in your current browser tab is convenient when returning from sign-in, but it should not be your only copy.
Select a voice and the script language
Pair your words with a voice from the catalog and a language setting.
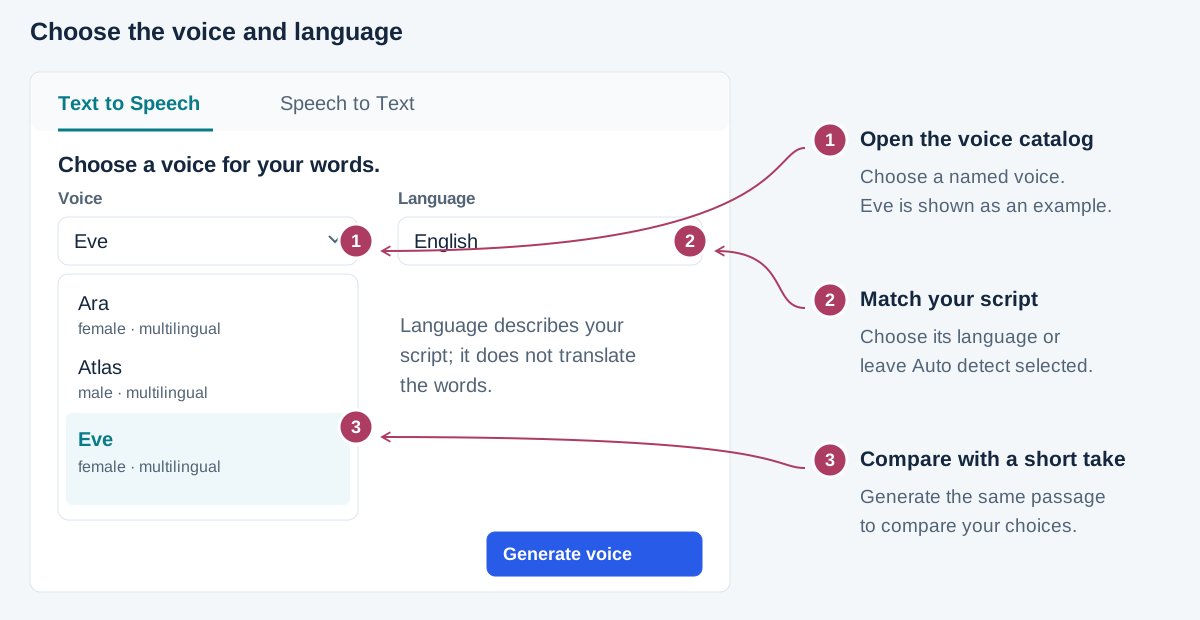
Open Voice beneath the script and choose a named voice. The dropdown displays catalog descriptions, including gender and language information where available. You can explore the list before signing in; it refreshes from the service after sign-in. If the interface reports that voices could not load, select Reload voices before submitting a request.
Next, open Language. Choose the language your script is written in, or leave Auto detect selected. Available choices include English, Chinese, French, German, Spanish, Japanese, and others shown in the dropdown. This setting describes the source text; it does not translate the script. Supply the wording in the language you want spoken.
To compare voices, keep the same short passage and generate separate takes. Include a sentence containing the names or technical terms your project depends on. Listen for clarity, pronunciation, and whether the reading fits the intended audience. Each generation is a separate task, so check your balance when experimenting with several choices.
Choose your audio output settings
Expand Audio settings before generating if your project needs a particular format.
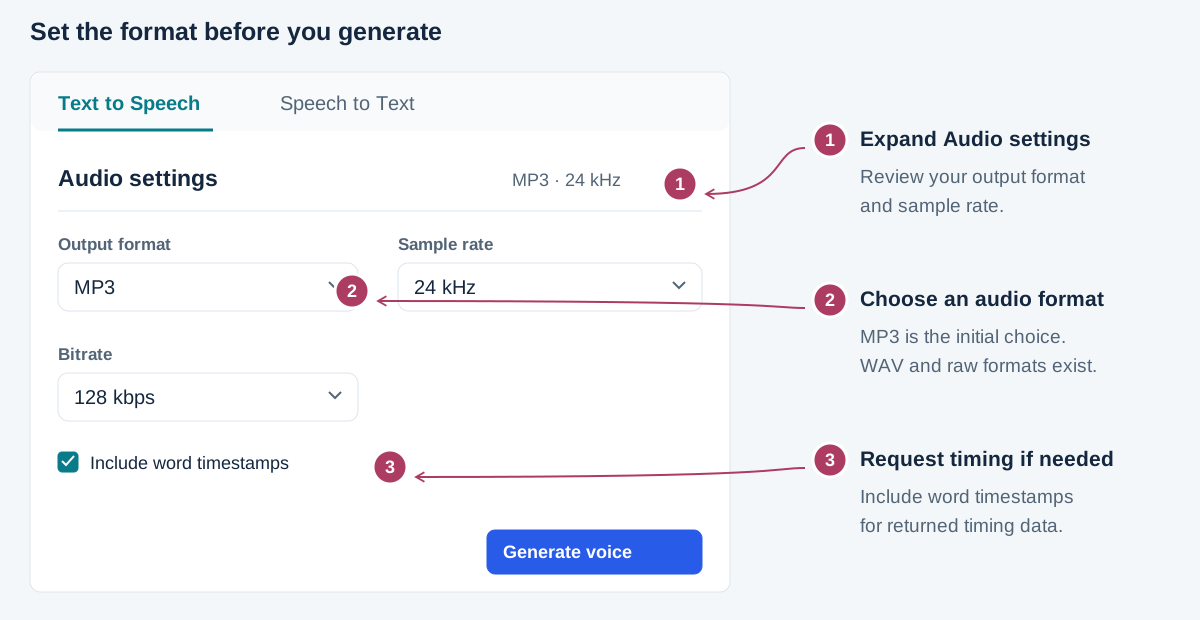
The generator initially uses MP3 at 24 kHz with a bitrate of 128 kbps. MP3 is a practical starting point for listening and sharing. Choose WAV if your editing workflow needs it. Output format also includes PCM, MULAW, and ALAW; these raw formats require compatible software and may not play in the browser result panel.
Sample rate offers values from 8 kHz to 48 kHz. The Bitrate control appears for MP3 and offers values from 32 to 192 kbps. Match these settings to the editor or destination that will receive your audio. Changing file settings does not fix an unclear script or guarantee a different pronunciation.
Enable Include word timestamps if you need timing information for later editing. When result data is returned, you can download it from the completed task. Timing data is separate from the audio download; this option does not itself create a finished subtitle file. Leave it off if you only need a spoken recording.
Generate your voiceover and follow its status
Review the script, voice, language, and format, then select Generate voice once.
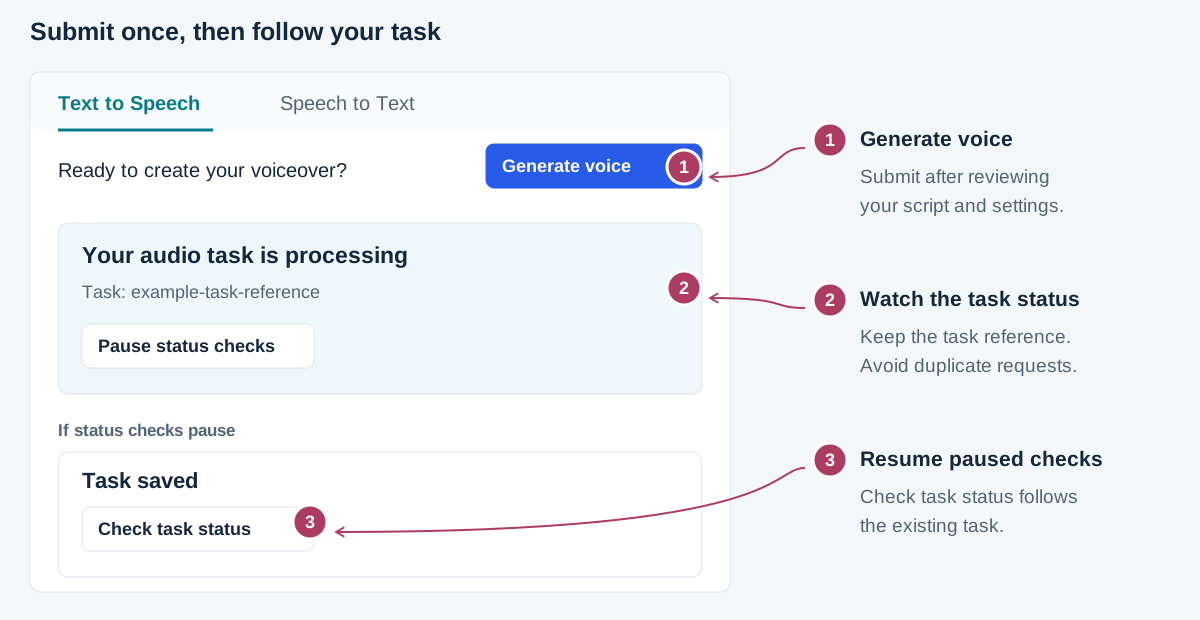
Generate voice sends your request and starts checking its status. The button changes while the request is being submitted or processed. Follow the message beneath the form and keep the task reference if you need help. Processing time can vary; the interface does not promise a fixed completion time or a percentage-based countdown.
Pause status checks stops the browser from checking, not the task itself. If checks pause, use Check task status to resume checking the same reference. Avoid clicking through a new submission simply because the result has not appeared yet. A separate request can use additional credits.
If the form reports an input error, correct the indicated field first. If Request status unknown appears after a connection problem, the request may already have reached the service. Review that warning before allowing another request. For a reported failure, keep the error message and task reference so support can identify the affected attempt.
Listen to the result and download your audio
When Your voiceover is ready appears, review the recording before saving your final take.
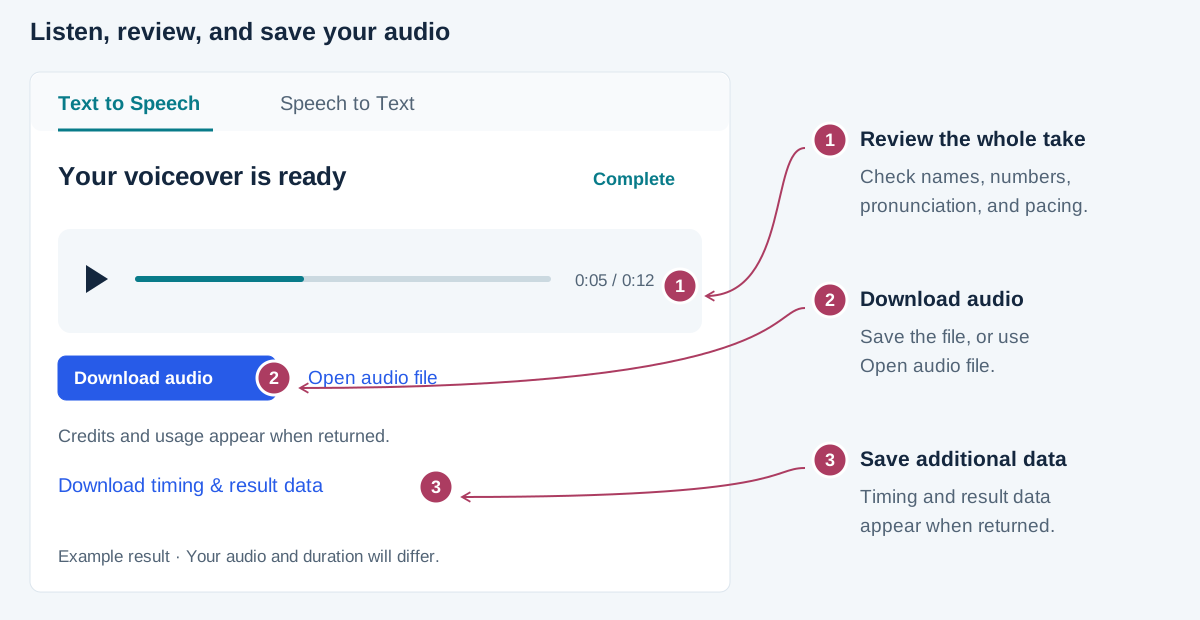
Use the audio player for a playable MP3 or WAV result. Listen through the whole recording, paying particular attention to names, numbers, pauses, and sentence endings. Compare it with your saved script, then try it alongside the video or slides it will accompany. For raw formats, download the file and review it in compatible software.
Select Download audio to save the generated file. If the browser cannot download it directly, use Open audio file and save it from the new tab. Download timing & result data appears when the service returns additional data. Actual credits used and usage appear when those values are provided with the result.
If a phrase needs work, revise the wording and generate another take. Keep the original until you approve its replacement, and use descriptive filenames to distinguish versions. You can also open My Creations from your avatar menu to view the creation records returned for your account. Save important outputs locally for your project.
Use Speech to Text to transcribe a recording
Switch to Speech to Text when your starting point is recorded speech.
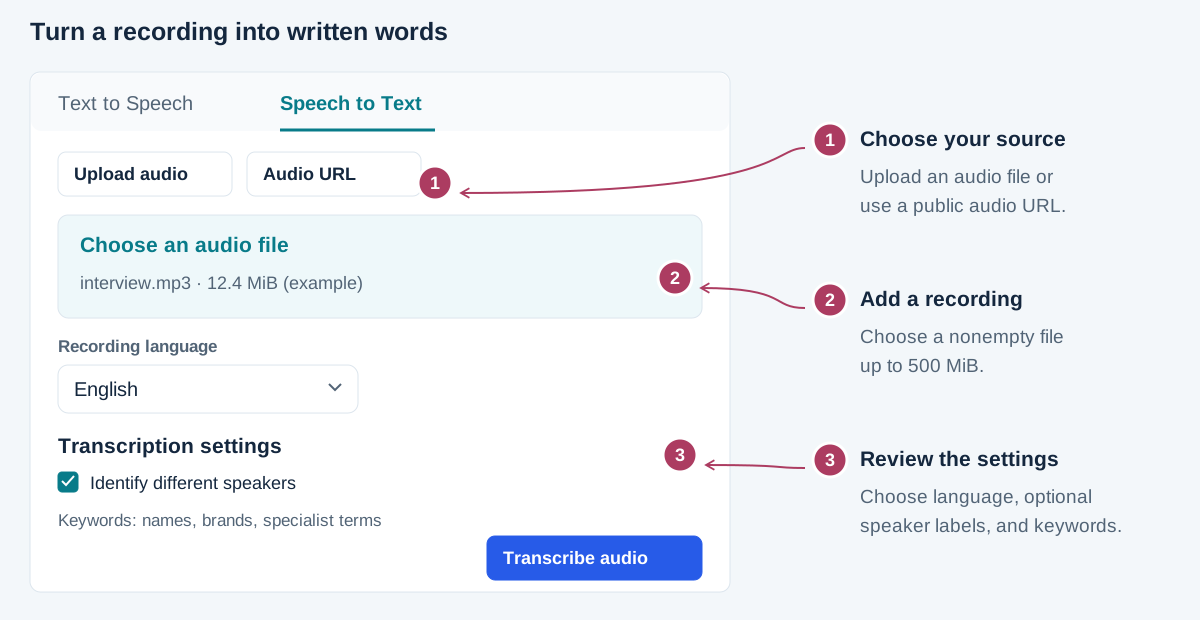
Select Upload audio, then Choose an audio file. Use a nonempty recording up to 500 MiB that you own or have permission to process. Alternatively, select Audio URL and enter a public HTTP or HTTPS link to accessible audio. A private sharing page that requires someone to sign in is not a direct audio source.
Set Recording language or use Auto detect. Open Transcription settings to request speaker identification, include filler words, or format the transcript. Format transcript requires an explicit language selection. Identify different speakers requests speaker labels; it does not verify the real identities of people in the recording.
Add useful names, brands, or specialist terms under Keywords, separated by commas. You can provide up to 100 keywords, with no more than 50 characters each. Keep them relevant to the recording. Select Transcribe audio and follow the task status as you would for a voiceover. Clear speech helps, but always review the resulting words against the source.
Review, save, or turn the transcript into speech
Your transcript is ready gives you three next steps: copy, download, or reuse.
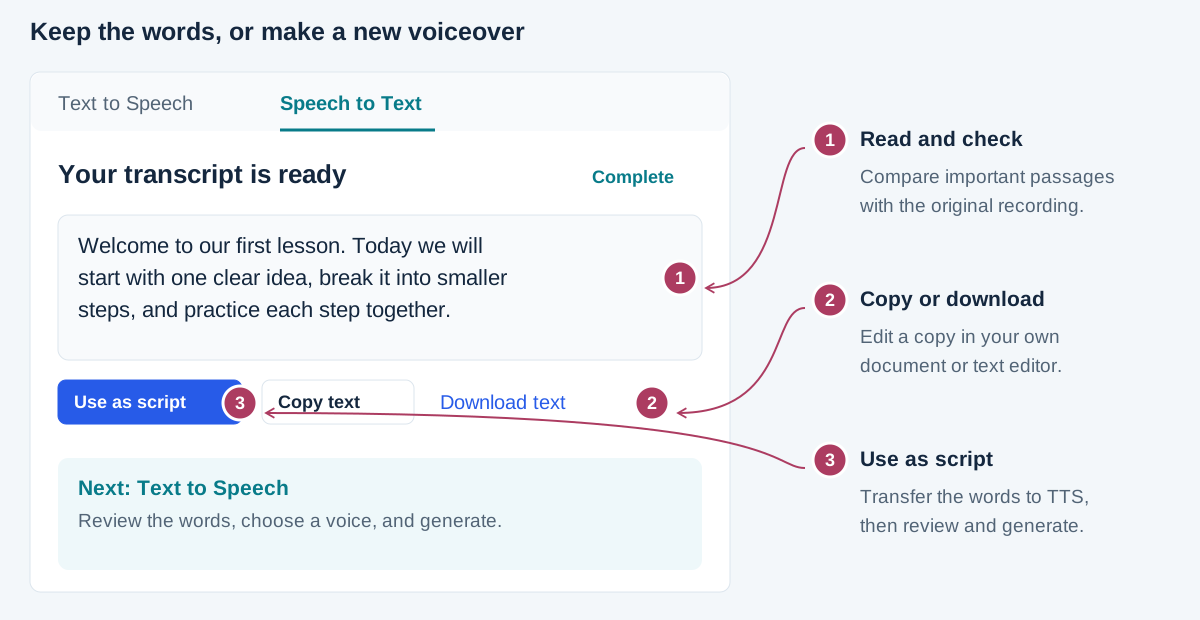
Read the transcript in the result panel and compare important passages with the recording. Check quotations, names, dates, and speaker changes. Use Copy text to paste it into your writing editor, or Download text to save a transcript.txt file. The result panel is read-only, so make corrections in your own document or after transferring the words to the script editor.
Use as script moves an eligible transcript into Text to Speech. This action is available for nonempty text within the 60,000-character limit. Review the transferred script, remove repetitions, select a catalog voice, and check the audio settings. Click Generate voice when you are ready to create a separate audio result.
For longer recordings, save the complete transcript and work on manageable sections in your editor. A transcript is a starting point for notes, articles, or narration; it is not automatically a summary or a translation. Keep the original recording alongside your corrected text so you can revisit uncertain wording before publishing or sharing.
Questions before your next take
Do I need to sign in before writing a script?
No. You can enter text and select settings as a visitor. Sign in before submitting a generation or transcription task, then review your draft and submit it manually. If sign-in reloads the page, choose any local audio file again.
Why did my transcript formatting request fail?
Check Recording language. Format transcript needs a specific language rather than Auto detect. Also confirm that your audio source is accessible and that keywords stay within the displayed requirements before trying again.
Should I resubmit a task that is taking longer?
Use Check task status when it is available. This checks the existing task. Pausing checks does not cancel processing, and submitting again may create another chargeable task. Keep the task reference when asking for help.
How many credits does a voiceover or transcript use?
Check your account balance and the usage returned with the completed task. Do not assume every script or recording costs the same. Review the current credit packs on Pricing and refresh My Account after a purchase to check your balance.
Review credit packs before a larger project. See the Privacy Policy for personal recordings, the Terms of Service for permitted use, and the Refund Policy for billing questions. Our Disclaimer explains the website’s independent status. For help with a task, email support@grokvoice.app with its reference and the error message.
Put your first script to work.
Start with a short passage, listen closely, and save a result you are happy with. Or bring a recording and turn the words into your next draft.
Create with Grok Voice